How to Play Spotify on iPod Nano

Have an old iPod Nano and want to play Spotify on it? No worry. In this post, we will show you an easy way on how to play Spotify on iPod Nano.

Part 1. Easy Tool to Get Spotify on iPod Nano

In order to play Spotify music on iPod Nano, you need to convert Spotify music as local files. For Spotify music, they are in special audio formats. And they can’t be used on other devices or platforms. So, if you want to play Spotify on iPod Nano, then you can find a tool to help you get Spotify music as local files first.

DRmare Spotify Music Converter is here to help you. It is the tool that can rip Spotify music as local files and can convert Spotify music to plain MP3, WAV and other audio formats with original quality. And it can batch download music from Spotify in a fast rate. So, you don’t need to take much time to convert Spotify music for iPod Nano.

Besides, the DRmare Spotify Music Converter supports you to reset the audio channel, sample rate, etc. as you like. And then you can get the converted Spotify songs on your computer and you can move Spotify music to iPod Nano for listening offline.

Part 2. How to Convert and Play Spotify on iPod Nano

Now, it’s time to use DRmare Spotify Music Converter to convert and download Spotify music for iPod Nano. Here are the steps for you as below.

Step 1. Get the DRmare Spotify Music Converter on your PC

Go to DRmare website to get the DRmare Music Converter on your computer. Just follow the installation instruction to finish installing.

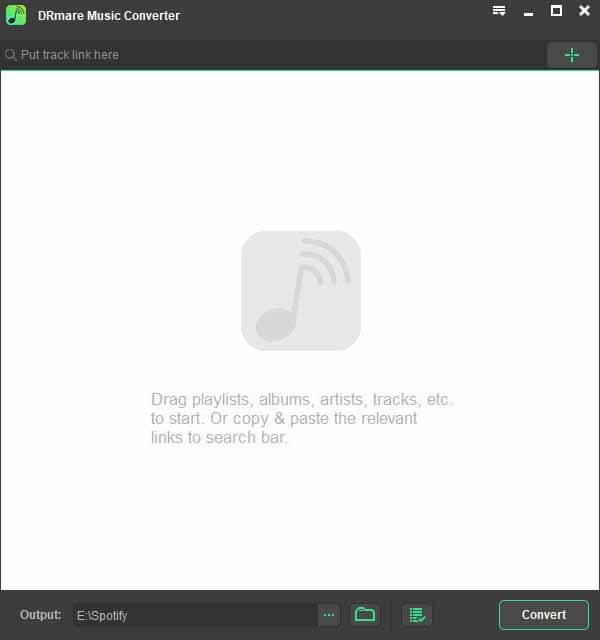
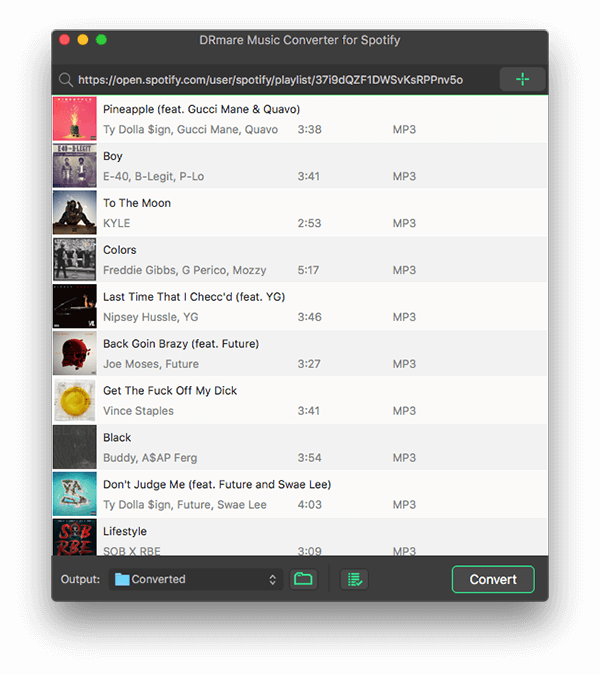
Step 2. Put Spotify songs on DRmare

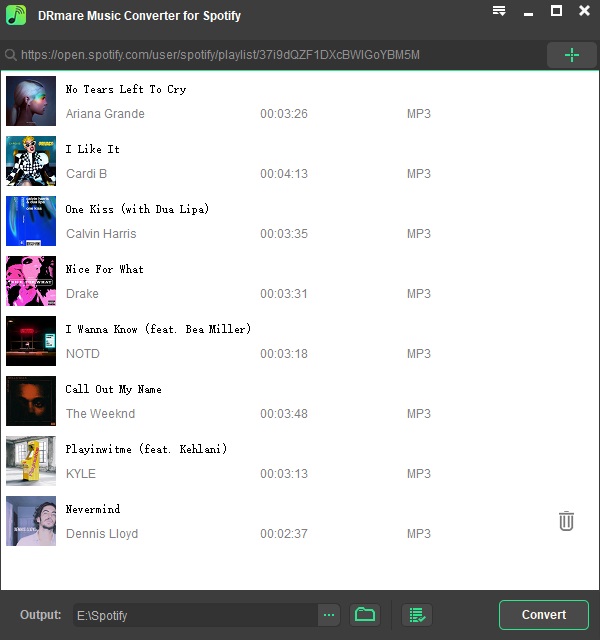
Once installed the DRmare Music Converter. Then open it. Then the main screen you can see. And the Spotify app loaded as well. Please go to Spotify app to choose the songs you like to convert for iPod Nano. Then drag and put them on the main screen of DRmare. And you can get the links of Spotify songs and load them to the search bar on DRmare. And then, hit the ‘+’ button to get the songs to DRmare for converting.

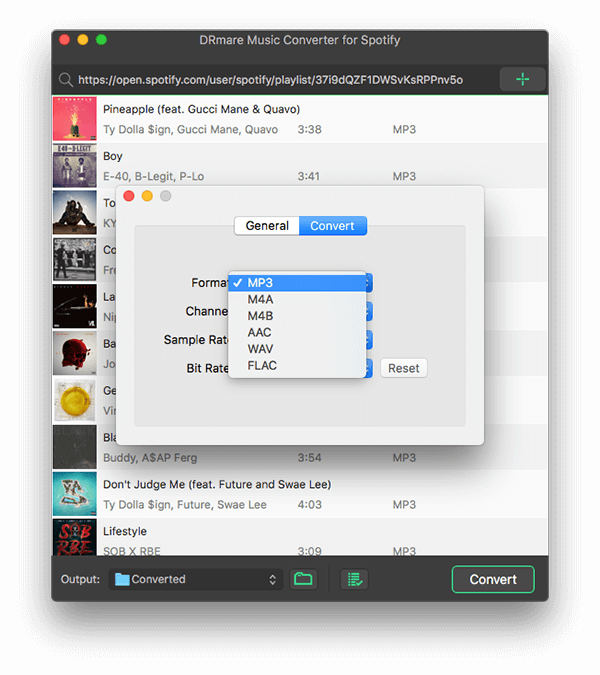
Step 3. Modify Spotify audio format for iPod Nano

Here for better listening experience of Spotify on iPod Nano, you need to set the output audio parameters for them. Hit the menu bar from the top right. Then go to choose ‘Preferences’. And then you can see a new screen, in which you need to click ‘Convert’ and start to set the output format. There is audio channel, bit rate, etc. for you to reset as you want. Once done, hit ‘OK’.

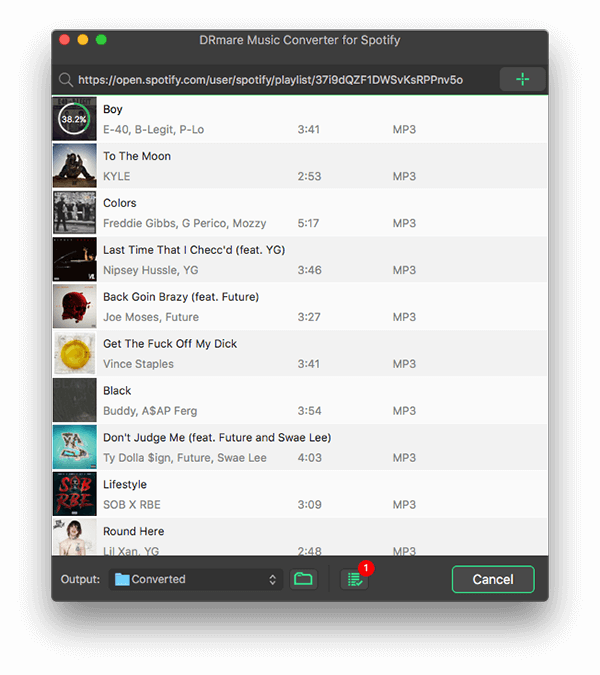
Step 4. Convert Spotify for iPod Nano

Here you can start to convert and download Spotify music for iPod Nano. Just touch on the ‘Convert’ button and you will get the Spotify music downloaded on your computer. Then you can move Spotify music to iTunes and put them on iPod Nano for listening offline.

Part 3. The Verdict

Above is the all steps that you need to get Spotify on iPod Nano. Just use the DRmare Spotify Music Converter and then you can easily convert and download Spotify music for iPod Nano. Then you can listen to Spotify music on iPod Nano with ease.

How to Play Spotify Music on Xbox One

Want to listen to your favorite Spotify songs while playing games on Xbox One but don’t know how? In this post, you can find the solution.

In this article, we will show you how to convert Spotify music as local files and put Spotify music on Xbox One for listening with ease.

Part 1. Easy Way to Play Spotify Music on Xbox One

Spotify allows users to play Spotify on Xbox One via Spotify app on Xbox One or via iOS or Android devices. But here we would like to recommend an alternative way for you to stream Spotify music on Xbox One.

The method here will help both free and premium Spotify users to enjoy Spotify music on Xbox One offline. To do that, the tool you will need is DRmare Music Converter.

It is an all-in-one music converter and downloader for Spotify music. You can use it to convert and download music from Spotify to MP3 and other plain audio formats. Then you can change the output audio format, bit rate, etc. of Spotify music for Xbox One. And then you can get the converted Spotify music as local files on your computer and you can move Spotify music to Xbox One for playing offline.

Besides, this tool can batch convert songs from Spotify with original audio quality. And it can save lots of your time. With the local Spotify music files, you can use and play Spotify music on any device you like offline.

Part 2. How to Convert and Play Spotify Music on Xbox One

So, how to use DRmare Music Converter? Here you can get the steps on how to convert Spotify music for Xbox One. Let’s check it out.

Step 1. Install and open DRmare Music Converter

Go to DRmare official website and download the DRmare Music Converter on your PC or Mac computer. Then install it at once.

Step 2. Open DRmare program

Once installed, then directly open the DRmare Music Converter. Then you can see the main interface of it. And you can see the Spotify app showed as well.

Step 3. Load tracks from Spotify to DRmare program

Go to the Spotify program, find Spotify songs you like to convert and play on Xbox One. Then drag them to DRmare program main screen one-by-one. Alternatively, you can get their links and put them on the search bar on DRmare one-by-one. And then hit the plus button to get the tracks into DRmare main interface.

Step 4. Reset Spotify audio format for Xbox One

Here you can reset the output audio format of Spotify for Xbox One. Please hit the menu icon from the top right in DRmare. Then go for ‘Preferences’. And then, in the new window, choose ‘Convert’. Then you are able to choose the audio format, bit rate, etc. of Spotify for Xbox One as you like.

Step 5. Convert Spotify for Xbox One

Now, click the ‘Convert’ button. DRmare program will start the job of converting Spotify for Xbox One. After a few seconds, the process stops. And you can get the converted Spotify music files on your computer. Please find them on your computer’s folder by hitting the ‘Converted’ > ‘search’ icon on DRmare.

Step 6. Put Spotify on Xbox One

Here to play Spotify on Xbox One, you need to move Spotify music to Xbox One from your computer first. Just put the USB drive on your computer and then move the converted Spotify music files to it. Then unlink the USB drive from your computer and link it to your Xbox One. After then, you can listen to Spotify music on Xbox One offline.

How to Put Spotify Music on OneDrive

Does Spotify work on OneDrive? OneDrive is a free storage service for users to save media files. But not all files can be saved to OneDrive. As for Spotify music, it is protected and in special audio format that can’t be supported by OneDrive. Thus, there are many users looking for a way to fix this issue.

Today, in this post, we will help you out. Here we will show the solution for you to put Spotify music on OneDrive. Then you can use Spotify music on other devices from OneDrive. Let’s dive in.

Part 1. Ultimate Tool to Convert Spotify Music for OneDrive

To get Spotify music as plain audio files and put Spotify songs on OneDrive, you need to use a third-party tool to help you. Here we would like to share a tool named DRmare Music Converter to you.

It is the tool that can rip protection from Spotify music files and save Spotify music as local files. And it can convert Spotify music songs to MP3, AAC and other common audio formats. Also, it can keep original sound quality of Spotify while running at a fast speed.

Besides, the DRmare Music Converter allows you to edit the channel, bit rate, etc. of Spotify music for OneDrive as you want. And after the conversion of Spotify to OneDrive, you can save the local Spotify audio files on your computer. Then you can move and upload Spotify music to OneDrive for using.

Part 2. How to Convert Spotify Music for Adding to OneDrive

As we had learned the key features of DRmare Music Converter, you may want to know how to use it. Here we will show you how to use DRmare Music Converter to convert Spotify music for OneDrive in details. Please check out the steps as below and see how to do that.

Step 1. Download DRmare Music Converter on DRmare website

For the first step, you need to download and install DRmare Music Converter onto your PC. Please enter the official website of DRmare and get the DRmare Music Converter downloaded and installed on your computer.

Step 2. Open the installed DRmare Music Converter on your computer

Once installed DRmare Music Converter on your device, please open it. Then you can see its main screen and the Spotify app loaded as well.

Step 3. Import wanted Spotify songs to DRmare

Enter to the Spotify program and find the songs you want to convert and upload to OneDrive. Once got, then drag & drop them to the main interface of DRmare one-by-one. Or you can put the songs’ link to DRmare’s search box and click the plus button to import the songs to DRmare.

Step 4. Define Spotify songs’ audio format for OneDrive

Hit the menu icon from the top right on DRmare. Then choose the ‘Preferences’ > ‘Convert’ option from the pop-up window. Then you can start to set the output audio format, bit rate, etc. for Spotify OneDrive.

Step 5. Convert Spotify for OneDrive

Now, click the ‘Convert’ button and the DRmare program will start the conversion of Spotify for OneDrive. Then you just need to wait for the process. Once done, you can get the converted Spotify songs on your computer. Then you can check them via the ‘history’ icon.

Step 6. Upload Spotify music to OneDrive

First, open the OneDrive on your Windows computer. Then create a new folder to save Spotify songs on OneDrive. Next, find and drag the local Spotify music to the new folder on OneDrive. Once uploaded, then you can use Spotify music on other devices via OneDrive with ease.

How to Add Spotify Music to iMovie

Want to add Spotify music to iMovie for your video clips, but failed? Do you know why? If not, then you can find the answer in this post.

Here in this post, we will show you how to add Spotify music to iMovie with ease. You may need help from the DRmare Music Converter. Let’s go on.

Part 1. Add Spotify Music to iMovie – Tool Needed

For Spotify music, it can’t be moved to other devices or platforms for using because they are protected. But please don’t worry. In this post, we will fix the issue out for you.

DRmare Music Converter is a tool here for you to get Spotify iMovie work. It can convert Spotify music for iMovie supported audio formats. And it can download Spotify music on your computer for you to move to iMovie.

In DRmare program, you can define the audio format as MP3, etc. of Spotify music for iMovie. And you can customize the channel bit rate, etc. for Spotify songs as you like. Besides, this tool can batch convert Spotify tracks in a fast rate so that you won’t take much time to finish.

Once converted, you can get the local Spotify music files on your computer. Then you can add Spotify music to iMovie for your video projects directly. And you can move Spotify music to other devices for using without any limit as well.

Part 2. How to Convert Spotify Music for iMovie

Now, it’s time to see how to convert Spotify music for iMovie via DRmare Music Converter. Below are the steps for you on how to use DRmare Music Converter. Just check it out and learn more.

Step 1. Open DRmare Music Converter to add Spotify songs

Get the DRmare Music Converter on your computer. Then launch it. Head to the Spotify software to find the music you like to convert for iMovie. Then drag them to DRmare main screen. Or copy and put their links to DRmare search bar and hit ‘+’ button.

Step 2. Reset Spotify audio format for iMovie

Click menu icon on the top bar on DRmare program. And then choose the ‘Preferences’. At the new window, choose the ‘Convert’ option. Then you are able to set Spotify format for iMovie. You can choose the right format of Spotify that iMovie supported. And you can alter the sample rate, channel, etc. of Spotify for iMovie.

Step 3. Convert Spotify music to iMovie

Right now, the Spotify music files is ready for converting. Just hit the ‘Convert’ button. And it will start. After a few seconds, you can go to the ‘Converted’ icon to check the converted Spotify audios for iMovie. And you can hit the ‘search’ icon to locate the downloaded Spotify tracks on your computer.

Part 3. How to Add Spotify Music to iMovie

As you had got the local Spotify music files, here let’s see how to put Spotify music on iMovie. Below is the steps on how to import Spotify to iMovie on Mac.

Step 1. Move converted Spotify music files to iTunes first.

Step 2. Sync Spotify music to iPhone or other iOS devices via iTunes.

Step 3. Open iMovie program.

Step 4. Hit ‘Audio’ > ‘iTunes’ to browse and locate the converted Spotify music files.

Step 5. Drag the Spotify file to iMovie you like. Then you can edit the audio file.

At last, you can add Spotify music to iMovie as the BGM for your video clips directly. Just enjoy the music and video via DRmare Music Converter.