How to Convert Spotify to WAV

“How can I get Spotify music as WAV format so that I can use them on my CD player?” As for the WAV format, it can offer the best audio quality for listeners and become more and more popular with people.

But how to convert Spotify music to WAV for listening? Is there any way to make it? Sure. In this post, you will see the best way to convert Spotify to WAV file for listening on your device.

Part 1. Best Spotify to WAV Converter

To convert Spotify music as WAV files, we need to use the third-party tool to help us. For Spotify music, we all know that the music files are protected which can’t be used directly on other devices. But please don’t worry. With the tool below, we could make it.

This tool is DRmare Spotify Music Converter. It can remove the protection from Spotify music and convert Spotify music to WAV, MP3, AAC and more formats with high quality. You could define the audio quality as well like the bit rate, sample rate, etc.

Besides, it can work at a fast speed without taking much of your time. And then you can save the Spotify music on your computer for using on other devices with ease.

Part 2. Convert Spotify to WAV Files – Detailed Steps

Now please install the DRmare Spotify Music Converter on your computer. Then follow the steps we show you below and start to convert Spotify to WAV format.

Step 1. Load Spotify tracks to DRmare program

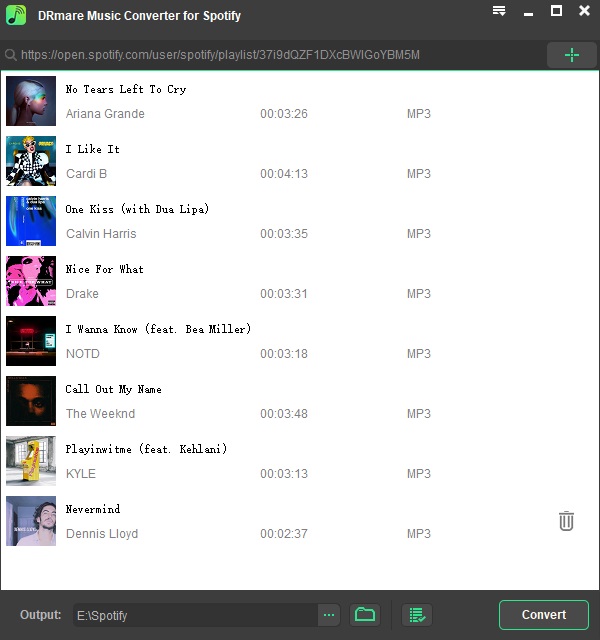
Launch DRmare Spotify Music Converter. Then go to the appeared Spotify app to find the songs you like. Then drag them to the main window of DRmare and it will load the tracks for you automatically. Or you can copy and paste the link of the track to the search box in DRmare program and click the ‘+’ button. It will work as well.

Step 2. Set Spotify as WAV format

Click the menu icon from the top-right corner of DRmare program. Then hit on ‘Preferences’ > ‘Convert’ option and you can start to set Spotify music as WAV file. You can also define the bit rate, channel, sample rate here as you want.

Step 3. Convert Spotify to WAV

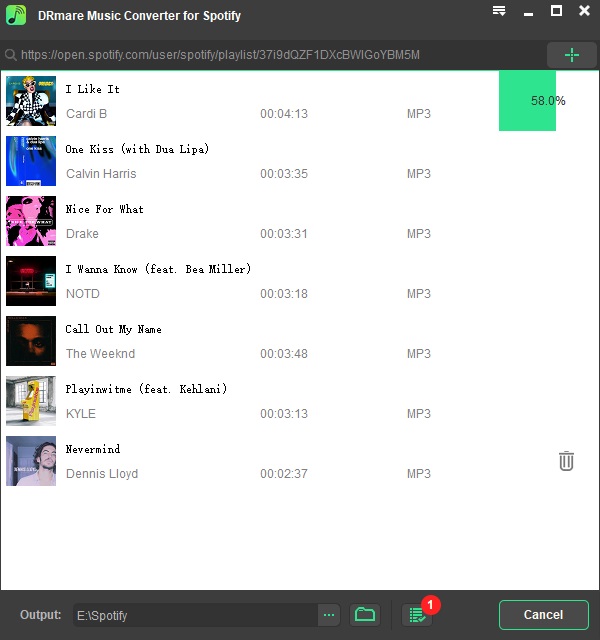
Now hit on the big ‘Convert’ button. Then you will get the Spotify music converted as WAV format and saved on your computer. You could hit on the ‘Converted’ button with a red dot on it to check your files.

How to Get Spotify Music on Chromebook

Can you listen to Spotify music on Chromebook? If you haven’t tried it, then you could follow this page and see how to get Spotify music for listening on Chromebook in details.

And to do that, we need help from a powerful third-party tool. Now let’s get started and learn more about the tip at once.

Part 1. Get Spotify Music on Chromebook Offline

When it is time to get Spotify music for Chromebook, the most important thing is to find a powerful tool. Here to help you out, we would like to recommend DRmare Spotify Music Converter to you. This tool is designed for Spotify music, which can convert and download playlists, album, etc. from Spotify with high quality.

In addition, it supports to set Spotify music as MP3, M4A, AAC, and more plain audio formats as you want. And you can define the output sound parameters like sample rate, channel, bit rate, etc. of Spotify tracks, which can enhance the music quality of your Spotify music and enjoy a better listening experience on Chromebook.

After converting, you can save the converted Spotify audios to your computer and then transfer them to your Chromebook for playing offline without any limit.

Part 2. Convert Spotify Music for Chromebook

In this part, let’s see how to use DRmare Spotify Music Converter to download and convert Spotify music for Chromebook.

Step 1. Import Spotify audios to DRmare program

Install and open the DRmare Spotify Music Converter. Then go to the pop-up Spotify app to find the music you like. Then drag them to the main interface of DRmare program. Or you can copy and paste the URL of the track to DRmare’s search box. After then, your Spotify files will be loaded.

Step 2. Set audio format for Chromebook

Please hit on the menu bar on the top right of DRmare. Then choose ‘Preferences’ > ‘Convert’ to set the output audio format for Chromebook. Here you can also define the channel, bit rate, sample rate for the Spotify music.

Step 3. Download Spotify music

Hit on the ‘Convert’ button. Then the conversion start. Once finished the conversion, you can get the Spotify music saved on your computer as local files. You could go to the ‘Converted’ button to check them out.

After then, you can move your local Spotify music to your Chromebook for listening offline with ease.

Tip to Listen to Spotify Music on Hisense TV

How to play Spotify music on Hisense TV? Maybe most of you wonder to know the solution as Spotify is not integrated with Hisense TV. So what can you do if you have a Hisense TV and want to listen to Spotify music with it?

Please take it ease. In this article, we are going to show you how to listen to Spotify music on Hisense TV without any limit. Please go ahead and follow our steps to see how to do that.

Part 1. How to Get Spotify on Hisense TV

To get Spotify on Hisense Smart TV, you need to use a third-party tool to help you.

Here let’s meet the DRmare Spotify Music Converter. This program is designed for Spotify music users who want to use Spotify on other devices. With this tool, you can convert and download Spotify music to other audio formats or Hisense TV supported formats with high quality. And you can change the audio parameters as you like in this program.

In addition, the DRmare program supports to batch convert Spotify tracks in a faster speed, which will not take much of your time for the whole conversion. And after the conversion, you can get the Spotify music converted and stored on your computer for using on Hisense TV and other platforms directly.

Part 2. How to Convert Spotify Music to Hisense Smart TV

In this part, we will show you how to convert Spotify music for listening on Hisense TV. Please check as below and see how to do that.

Step 1. Upload Spotify songs to DRmare

Install and open DRmare Spotify Music Converter on your computer. Go to the pop-up Spotify app to find songs you like to play on Hisense TV. Drag the tracks to the main window of DRmare program. Or you can copy and paste the link of the Spotify track to the search bar on DRmare program. After then, your Spotify tracks will be loaded to DRmare program for converting.

Step 2. Customize Spotify audio format

On Windows version, click on the menu bar at the top right of DRmare and click on the ‘Preferences’ option. Then hit ‘Convert’. While on Mac version, please touch on the ‘DRmare Spotify Music Converter’ at the left side of your Mac system. Then tap ‘Preferences’ > ‘Convert’. Now you will see the setting window, in which you can set Spotify output audio format for Hisense Smart TV. And you can define the bit rate, etc. for the audio quality.

Step 3. Convert Spotify for Hisense TV

Tap on the ‘Convert’ button to start the conversion. After a while, the Spotify songs will be converted and saved to your computer. You can check them by the ‘Converted’ button.

Part 3. How to Put Spotify Music on Hisense TV

In the last part, we will show you how to put the converted Spotify music to Hisense TV for listening via Google Play Music.

  1. Go to your Hisense TV to download and install Google Play Music app on it.
  2. Enter to Google Play Music web player with your Google account. on your computer.
  3. Touch on the Menu > Upload Music on Google Play Music web player.
  4. Drag the downloaded and converted Spotify sonsg tp Google Play Music.
  5. After that, you can listen to Spotify music on Hisense TV easily.

Solution to Add Spotify Music to Video

“Is it possible to add music from Spotify to video clips as the background music? I want to add some music to my video and make them more wonderful. But I know that Spotify music can’t be used directly. That is to say, I have no way to add Spotify music to video now. Thus, I wonder if there is anyone that can help me out? Is there any way to fix it?”

To fix this issue, in this post, we will show you the best tip. Here you could follow the post and learn how to add Spotify music to video steps by steps. Now let’s move on.

Part 1. Get Spotify Music for Video – Best Tool

As for Spotify music, we had known that they can’t be used on any other devices directly due to the right protection. Therefore, to break this limit, we need to use a third-party tool. Here let’s meet the DRmare Spotify Music Converter for Windows.

This tool can work well for Spotify music. It can convert and download Spotify music to MP3, AAC, WAV and other plain audio formats or the formats that your video app supported. And it can convert the music with high quality so that you can enjoy the better listening experience.

In addition, it can convert multiple Spotify tracks at a time in a faster speed so that you can save lots of your time. And the converted Spotify music can be saved with full ID3 tags like title, album, genre, etc. You can easily manage your Spotify files on your device and then use them on other devices without any limit.

Part 2. How to Convert Spotify Music to Video – Detailed Steps

After checking the main features of DRmare Spotify Music Converter, now you must be eager to see how it works. Please take it ease. Now we will show you the steps on how to convert Spotify music for video first and then add music from Spotify to video. Please follow the steps below and do that.

Step 1. Import Spotify tracks to DRmare program

First, you need to download and install the DRmare Spotify Music Converter on your computer. Once finished, please open it. Then the Spotify app will show up at the same time. Then go to Spotify app to search the songs you like to make as your video’s background music. When you found it, please directly drag and drop it to the main screen of DRmare program. Or you could copy and paste its link and put the link to the search bar on DRmare main window. Then DRmare program will load the tracks for you automatically.

Step 2. Define Spotify audio format

Now move your mouse to the menu bar and click the menu icon. Then click ‘Preferences’ > ‘Convert’ option. A new window will pop up, in which you can modify the output audio format for Spotify music files. You could set the output format as MP3, M4A, M4B, FLAC, and more. And you can customize the channel, sample rate and bit rate according to your needs.

Step 3. Convert Spotify music to video

Here please press on the ‘Convert’ button, then the DRmare program will start to convert Spotify music for video. After a while, the Spotify tracks will be converted and saved onto your computer. You can hit on the ‘Converted’ button to check them on your computer.

Part 3. How to Add Music from Spotify to Video on Phone

Link your phone to the computer via the USB cable. If you are iPhone users, please upload and sync Spotify music to iTunes library on iPhone from the local folder on computer. While for Android users, please directly copy and paste the local Spotify files to the music folder on your phone. After then, you can add Spotify music to video via your phone directly.

How to Transfer Spotify Music to SD Card

“How to transfer Spotify music to SD card?” It is easy to do that if you are the premium users of Spotify. However, if you are just the free user of Spotify, then you don’t allow to do that directly.

Thus, is there a way to help Spotify free users to transfer Spotify music to SD card for saving? Sure! In the following passage, we will show you how to convert and transfer Spotify to SD card with ease. Just check it out right now.

Part 1. Get Spotify Music to SD Card at Free

For Spotify free suers, to transfer Spotify music to SD card, you can use the DRmare Spotify Music Converter. It is a powerful tool that allows Spotify free and premium users to get music off Spotify with ease. And it can convert Spotify music to multiple audio formats with original quality.

And you can define the other audio parameters like bit rate, channel, sample rate, etc. to make better your Spotify music. Besides, this tool can batch convert Spotify music at a fast speed so you don’t need to worry it will take much of your time.

Part 2. How to Convert and Move Spotify to SD Card

In this part, you could follow the steps below to start to convert Spotify music to common audios. Then you can transfer them to SD card for storing and using as you want.

Step 1. Import Spotify music to DRmare

Please install the DRmare Spotify Music Converter on your computer. Once done, please open it. Then the Spotify app will show up. Please find and add Spotify tracks to DRmare. You could copy and paste the link of the track to the search box on DRmare program. Or you could directly drag the tracks to the main screen of DRmare program.

Step 2. Define Spotify output audio format for SD card

You could set the output audio format for your Spotify music. Please find the ‘Preferences’ and then you can see the setting window, in which you can define the audio format, bit rate, sample rate, etc. as you want.

Step 3. Convert Spotify music for SD card

Once finished the settings, you can click on the ‘Convert’ button to start the conversion. After that, you can get the converted Spotify music files onto your computer.

Step 4. Move Spotify to SD card

  1. Insert your SD card to the card reader port of your computer.
  2. Find and copy and paste the converted Spotify music to the SD card.
  3. Put your SD card to your portable devices for listening to Spotify music offline on the go.